Table of Contents
In this chapter, we introduce the Sesame API, and give some brief code examples to show how this API can be used to communicate with Sesame from another program, either remote, or locally, and how it can be used as a library instead of as a server.
The Javadoc reference for the Sesame API is available online.
In Figure 7.1, “The Sesame architecture” an overview of Sesame's overall architecture is given.
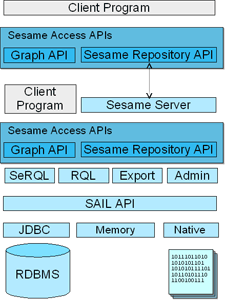
Starting at the bottom, the Storage And Inference Layer, or SAIL API, is an internal Sesame API that abstracts from the storage format used (i.e. whether the data is stored in an RDBMS, in memory, or in files, for example), and provides reasoning support. SAIL implementations can also be stacked on top of each other, to provide functionality such as caching or concurrent access handling.
On top of the SAIL, we find Sesame's functional modules, such as the SeRQL, RQL and RDQL query engines, the admin module, and RDF export. Access to these functional modules is available through Sesame's Access APIs, consisting of two seperate parts: the Repository API and the Graph API. The Repository API provides high-level access to Sesame repositories, such as querying, storing of rdf files, extracting RDF, etc. The Graph API provides more fine-grained support for RDF manipulation, such as adding and removing individual statements, and creation of small RDF models directly from code. The two APIs complement each other in functionality, and are in practice often used together.
The Access APIs provide direct access to Sesame's functional modules, either to a client program (for example, a desktop application that uses Sesame as a library), or to the next component of Sesame's architecture, the Sesame server. This is a component that provides HTTP- and RMI-based access to Sesame's APIs. Then, on the remote HTTP/RMI client side, we again find the access APIs, which can again be used for communicating with Sesame, this time not as a library, but as a server running on a remote location.
While each part of the Sesame code is publicly available and extensible, most developers will be primarily interested in the Access APIs, for communicating with a Sesame RDF model or a Sesame repository from their application. In the next sections, these APIs are described in more detail, through several code examples.
The Repository API is the central access point for Sesame repositories. It can be used to query and update the contents of both local and remote repositories. The Repository API handles all the details of client-server communication, allowing you to handle remote repositories as easily as local ones.
The main interfaces for the repository API can be found in package org.openrdf.sesame.repository. The implementations of these interface for local and remote repositories can be found in subpackages of this package.
In the following sections, the repository API is explained in more detail. We will show how one connects to an existing repository, how to configure a new (local or remote) Sesame repository, and how to perform queries or other actions.
The first step in any action that involves Sesame repositories is to get hold of a SesameRepository object representing it. The following sections explain how to do this for a local repository, a remote repository and a server repository.
Local repositories are very useful when you have to deal with some RDF in your own application. You can quickly create a local repository directly from your own program (without the use of any configuration files or databases), and store RDF in it, query this RDF and change it if necessary.
To quickly create a non-inferencing main-memory repository, one can use the following code:
LocalService service = Sesame.getService();
boolean inferencing = true;
LocalRepository myRepository = service.createRepository("myRep", inferencing);
This creates a local repository that uses main memory for storing its data. The boolean parameter inferencing indicates whether the repository should do RDF Schema inferencing. Note that the created repository is volatile: its contents are lost when the object is garbage collected or when the program is shut down.
For many purposes, the above way of creating a repository is convenient and sufficient. Sometimes, however, you may want to have a little more control over the exact configuration of a repository. For example, you may want to have a repository that dumps its contents to file. In such cases, you can create a RepositoryConfig object, configure it to your liking and pass that object to the createRepository() method of class LocalRepository.
In the following example, we again create a local repository, but this time we specify that it should use a file for persistence. First, we need to create a RepositoryConfig object that specifies the configuration of our required repository. In this example, we create a specification for a repository with ID "myCustomRep" that uses a stack of two Sails -- a main-memory Sail with schema support, and a synchronization Sail on top -- and which uses the file C:\TEMP\myCustomRep.rdf as a dump file for persistent storage.
RepositoryConfig repConfig = new RepositoryConfig("myCustomRep");

SailConfig syncSail = new SailConfig("org.openrdf.sesame.sailimpl.sync.SyncRdfSchemaRepository");
SailConfig memSail = new org.openrdf.sesame.sailimpl.memory.RdfSchemaRepositoryConfig(
                                                   "C:\\tmp\\myCustomRep.rdf", RDFFormat.RDFXML);

repConfig.addSail(syncSail);
repConfig.addSail(memSail);
repConfig.setWorldReadable(true);
repConfig.setWorldWriteable(true);
As you can see, by using the SailConfig and RepositoryConfig classes, we can fine-tune the configuration of our repository. We specify the types of Sails that are to be used, any paramaters for those Sails (these are the same parameters as described in Chapter 4, Advanced repository configuration), and read and write permissions. Note that we use the utility class RdfSchemaRepositoryConfig from package org.openrdf.sesame.sailimpl.memory in this example. This class is a subclass of SailConfig with main-memory specific methods for easy configuration. Utility classes like these are available for most Sail implementations.
Now that we have created the repository specification, creating a repository object for it is a snap:
LocalRepository myCustomRepository = service.createRepository(repConfig);
The resulting LocalRepository object can then be used to add RDF data, to query the added data, etc. We will briefly illustrate this in one of the following sections.
When we are using a remote Sesame server, we need to set up a connection with the remote server and identify the repository that we want to use. The code example below sets up a remote connection to a Sesame server over HTTP. The server is running at the location http://HOSTNAME/SESAME_DIR/ and we are authenticating ourselves using the username USERNAME and the password PASSWORD.
java.net.URL sesameServerURL = new java.net.URL("http://HOSTNAME/SESAME_DIR/");
SesameService service = Sesame.getService(sesameServerURL);
service.login("USERNAME", "PASSWORD");
The example for RMI-based communication is nearly identical:
java.net.URI sesameServerURI = new java.net.URI("rmi://HOSTNAME:PORT/");
SesameService service = Sesame.getService(sesameServerURI);
service.login("USERNAME", "PASSWORD");
Please note that we are using a URL object in the HTTP example and a URI object in the RMI example.
The next step is to connect to a specific repository on this server. Assuming that we want to connect to the repository that is identified by the string remoteRepositoryID:
SesameRepository myRepository = service.getRepository("remoteRepositoryID");Of course, all of the above may not succeed for a number of reasons, such as the user not being known, having passed an erroneous password, or perhaps the server is not available. You will need to handle the exceptions thrown for all these cases. These exceptions are all documented in the Javadoc documentation. For the sake of keeping the examples simple, we will ignore these exceptions here.
In the previous examples, we have seen how to quickly create a local repository on the spot, or how to connect through a remote communication protocol (like HTTP or RMI) to a running Sesame server. In this section, we describe a special use case of the repository API, namely one where we want to extend the functionality of a Sesame server. An example of this is the creation of a new JSP page for the server. Of course, one can communicate with the local server through the remote access method shown earlier, but Sesame also allows us to use the local access method on a running server, which is much more efficient because the data does not need to beserialized and deserialized.
The Sesame server is represented by the class org.openrdf.sesame.server.SesameServer. Among other things, this class allows us to retrieve the LocalService that is used by the server by calling the getLocalService() method:
LocalService service = SesameServer.getLocalService();
Using this object we can get to the available repositories in an identical fashion as in the local repository scenario.
Note: this method of accessing the server locally only works if the code that executes the getLocalService() method is executed within the same Java Virtual Machine as the one on which the server itself runs. For example, this can be used if you wish to add JSP pages to your website, and these JSP pages are hosted on the same server as the Sesame server. It will not work, however, if you are programming a standalone program that happens to be executed on the same machine as the Sesame server.
Now that we have a connection to a repository (either remote or local), we want to do something with it. As you can see in the Javadoc documentation, there are a number of methods available for SesameRepository objects. We will show an example that performs a SeRQL query on a SesameRepository object called myRepository, retrieve the result as a table, and dumps its values to standard output:
String query = "SELECT * FROM {x} p {y}";
QueryResultsTable resultsTable = myRepository.performTableQuery(QueryLanguage.SERQL, query);

int rowCount = resultsTable.getRowCount();
int columnCount = resultsTable.getColumnCount();

for (int row = 0; row < rowCount; row++) {
    for (int column = 0; column < columnCount; column++) {
        Value value = resultsTable.getValue(row, column);

        if (value != null) {
            System.out.print(value.toString());
        }
        else {
            System.out.print("null");
        }

        System.out.print("\t");
    }

    System.out.println();
}
A large variety of operations can be performed on repositories in a similar way as the above example. Of course, all such operations are only allowed if you have sufficient prilileges to perform the operation. This may require you to log in to the SesameService prior to obtaining the repository object. For example, if you do not have read acccess on myRepository, the above example will throw an AccessDeniedException.
Adding RDF to a repository can be done in several ways: the RDF can be in the form of a local file, a location on the Web, or a java String object. Individual RDF statements can not be added through the repository API. For that purpose, use the Graph API (see the next section).
The method in the Repository API for adding data is named addData() and it takes several parameters. The first parameter is the data source. This can be either a java String that contains the actual RDF, a java.net.URL that specifies the location of an RDF file on the Web, a java.io.File, or an java.io.InputStream. We will use a URL in the next example.
The addData() method takes several other parameters. The parameter baseURI specifies the base URI that any relative URIs in the data should be resolved against. format specifies the format of the data (RDF/XML, N-Triples or Turtle). verifyData is a boolean flag that specifies whether the data should be checked for syntactic correctness before attempting upload. Finally, listener specifies an AdminListener object to which status updates during upload, and possible errors and warnings, are reported.
There are several types of AdminListener available. The AdminMsgCollector collects all messages and offers convenience methods for checking e.g. whether any errors were reported. StdOutAdminListener simply prints all messages to StdOut. For other purposes, it can be useful or necessary to implement your own AdminListener. We will use the StdOutAdminListener in the following example.
java.net.URL myRDFData = new java.net.URL("http://www.foo.com/bar/myRdfFile.rdf");
String baseURI = "http://my.base.uri#";
boolean verifyData = true;
AdminListener myListener = new StdOutAdminListener();

myRepository.addData(myRDFData, baseURI, RDFFormat.RDFXML, verifyData, myListener);The Graph API provides a representaton of an RDF graph in the form of a Java object. The main interface for the Graph API is org.openrdf.model.Graph. The purpose of this class is to offer a convenient way for handling RDF graphs from code. Graphs can be built by programmaticaly adding statements to it, or they can be created by evaluating a SeRQL-construct query on a Sesame repository.
In the next sections we will show how to use the Graph API in your own program.
An empty graph can be acquired by simply creating a GraphImpl object:
Graph myGraph = new org.openrdf.model.impl.GraphImpl();
To add new statements to this graph, we have to create the building blocks of these statements (the subject, predicate, and object) first. This can be done using a ValueFactory object, which can be obtained from the graph, as is shown in the following example:
ValueFactory myFactory = myGraph.getValueFactory();
String namespace = "http://www.foo.com/bar#";

URI mySubject = myFactory.createURI(namespace, "actor1");
URI myPredicate = myFactory.createURI(namespace, "hasName");
Literal myObject = myFactory.createLiteral("Tom Hanks");

myGraph.add(mySubject, myPredicate, myObject);
We have now added a single statement to the graph, namely that actor1 has a property hasName with the value "Tom Hanks".
More statements can be added in the same manner, but sometimes it is more convenient to use the URIs directly to add properties to it:
URI actorClass = myFactory.createURI(namespace, "Actor");
URI rdfType = myFactory.createURI(org.openrdf.vocabulary.RDF.TYPE);
mySubject.addProperty(rdfType, actorClass);
The above code adds a new statement to the graph that produced the ValueFactory that was used to create mySubject. This code is equivalent to the following:
URI actorClass = myFactory.createURI(namespace, "Actor");
URI rdfType = myFactory.createURI(org.openrdf.vocabulary.RDF.TYPE);
myGraph.add(mySubject, rdfType, actorClass);
Now that we have created a graph, we can use it to add all of its statements to our repository:
myRepository.addGraph(myGraph);
We can remove the graph from the repository in the same way:
myRepository.removeGraph(myGraph);
Often, you will not want to create a new graph from scratch, but rather create a graph that contains statements that are in a (local) Sesame repository. The Repository API allows you to do just this: it can produce a Graph object that wraps a local repository:
Graph myGraph = myLocalRepository.getGraph();
The produced Graph object allows you to use all of its convenience methods for manipulating the RDF graph. All changes that are made on the Graph object are directly passed on to the underlying repository.
In the previous section we have seen how to create a graph view for a local repository. This is easy, but it might not always be what you want: it doesn't work for remote repositories and it always gives you a "live" view of the complete contents of the repository. Sometimes you may want to create a local copy of (a subset of) the RDF graph. Graph queries can be used to accomplish this.
The Repository API offers two methods for evaluating graph queries, of which one returns a Graph object for the statements produced by the query. This method can be used to extract (a subset of) the statements from a repository into a local copy.
The following code fragment uses a SeRQL-construct query to create a Graph object containing all rdfs:subClassOf statements:
String query = "CONSTRUCT * FROM {SubClass} rdfs:subClassOf {SuperClass}";
Graph classHierarchy = myRepository.performGraphQuery(QueryLanguage.SERQL, query);
A graph created in this fashion will be independent from the repository it was extracted from: changes to the graph will not be passed on to the repository.
The Graph API, in combination with graph queries, can be very useful when you wish to update (e.g. change the value of) a large number of statements in your repository.
For example, suppose we have a repository that contains a large number of statements with a property NumberOfWheels, and we wish to change the property value from "3" to "4" for each statement. To achieve this, we can do the following:
myRepository.addGraph(QueryLanguage.SERQL,
    "CONSTRUCT {X} <http://www.foo.com/bar#NumberOfWheels> {\"4\"} " +
    "FROM {X} <http://www.foo.com/bar#NumberOfWheels> {\"3\"}");

myRepository.removeGraph(QueryLanguage.SERQL,
    "CONSTRUCT * " +
    "FROM {X} <http://www.foo.com/bar#NumberOfWheels> {\"3\"}";
What happens here is the following: the first query derives new statements from the existing NumberOfWheels statements, changing the object of these statements from "3" to "4". These new statements are then added to the repository.
The second query selects all NumberOfWheels statements with the object "3" and removes them from the repository.
Note that in this particular example the order in which the add and remove operation are executed is important: the add operation uses a query that selects all resource that have a property NumberOfWheels with value "3". If we had removed all of the matching statements first, the add operation would not have had any effect.
Ideally, one would have the posibility to use SQL-like INSERT and REPLACE queries to perform this kind of operations. Extending SeRQL with these types of queries is on the TODO list.